
I had a total craving for these cookies I made awhile back called Coraline Cookies. I had the craving for almost two weeks and I finally got around to making them. This was my second time making them and I thought, "Shoot! I am a pro at these! I don't need any stinkin' directions to follow!" Pfft! Let's see what happened...

I found this recipe awhile back from Bakerella.com. If you have seen the movie you know that Coraline's "Mother" and those in the parallel world have button eyes.

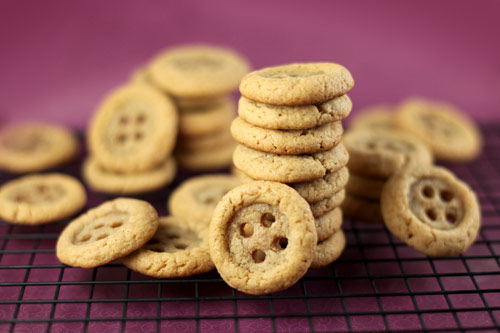
These cookies are based on those cute, little button eyes. (Whether those with the eyes in the movie are evil or not, these will not make you evil....they will satisfy your sweet tooth though!)
Coraline Button Cookies
Start off with your favorite peanut butter cookie recipe. I used one from one of my go-to cook books, The Better Homes and Gardens New Cook Book. You will also need a clean two-liter bottle cap, straw, and melted chocolate (optional).
Peanut Butter Cookies

1/2 cup butter, softened
1/2 cup peanut butter
1/2 cup granulated sugar
1/2 cup packed brown sugar or 1/4 cup honey
(I used brown sugar)
1/2 teaspoon baking soda
1/2 teaspoon baking powder
1 egg
1/2 teaspoon vanilla
1 1/4 cups all-purpose flour
1. Beat butter and peanut butter with an electric mixer on medium high speed for 30 seconds. Add the granulated sugar, brown sugar, baking soda, and baking powder. Beat until combined, scraping sides of bowl. Beat in the egg and vanilla until combined. Beat in as much of the flour as you can with the mixer. Stir in remaining flour.

If necessary, cover and chill dough until easy to handle. (I find this is a must! Also a must in between batches in the oven)
2. (This is where the recipe turns in to the Coraline Cookie Way) Preheat oven to 350 degrees F. Take very small amounts of the peanut butter cookie dough and shape into small balls (should be small enough to fit into the bottle cap). **


Bake cookies for 8-10 minutes.
3. When you first remove cookies from the oven, take the bottle cap and press it flat side down on top of the cookie so it forms a small outer edge.


4. As soon as you are finished with this step, grab the straw and begin making the four button holes before the cookies cool. Just take the straw and twist to form the holes.

5. Transfer to cooling rack and let cool.
At this point, if you decide to, you can melt chocolate and either dip the cookies in the chocolate to form a coating on them or drizzle the chocolate over the top. If not, then they are ready to be gobbled up!
I myself didn't do anything with chocolate the first time I made them, but decided to switch it up this time and include some chocolate. I preferred making them without the chocolate. Maybe my chocolate just didn't get to the right melted-ness or cooled off too easy. But dipping them in the chocolate just made the cookies really fragile and they broke. I ended up just drizzling the chocolate on top, but that was just an added mess for me to clean up. So, for you-just play it by ear. They are just as good un-chocolate covered!

B doing his best button-eyed impression before eating his share up!
**Where these asterisks are is where I decided to be baker-know-it-all and f'd up my first batch. I made really large balls of dough and I pushed them flat BEFORE they went into the oven. They turned out all flat and sloppy! Eat-able yes, but button cookies-no!**
Just a warning that I am going to put along with these cookies, they are definitely bite sized! So grabbing a handful and eating away is super easy! Not that it should deter you from making these, just let your thighs know ahead of time. An added bonus is that the kids think they are so cute and love eating them, they may just eat them all before you do!
No comments:
Post a Comment
I love feedback! Thanks ahead for any comments